Double Elevator Control Horn with Ball Link
The new removable tail for the Reaction ARF requires you to disconnect the elevator pushrod every time the tail
is removed. You supplied clevis is okay, but repeatedly putting it on and taking it off can cause wear and tear
on the single horn, and the locking clip is easy to lose. A better system is to use a metal ball link instead of
the clevis, sandwiched between two control horns. It's a simple idea, but gathering all the odd components can
be a pain. BTE helps you avoid that hassle by offering a complete package.
|
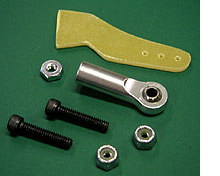
 The Package Includes all that is shown here.
1 Extra Control Horn (one comes with the ARF)
1 Metal Ball Link (resists heat better than plastic)
1 4-40 Hex Nut (to jam against the ball link)
2 5-40 x 5/8" Socket-Head Bolts (no-slop fit in link)
2 5-40 Nylon Insert Lock Nuts (for security)
Note: Two bolts and nuts are supplied - keep one set in your flight box just in case. They
are an odd size and difficult to find.
|

|
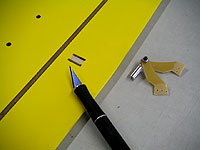
 Installation is Simple. Drill your horns for a good fit with the 5-40 bolt. Assemble your horns
and ball link to get the proper spacing for a second slot (either side is okay). Carefully cut the slot
with a sharp hobby knife. The block of balsa inside the elevator is
about one inch wide, so you will have to nibble away at the wood with the knife tip. Scratch away the
paint between the slots, and you are ready to glue.
|

|
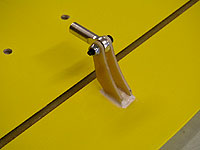
 The Finished Double Horn. Use a good epoxy to glue the horns in place and allow to dry. Now the
ball link can be removed and screwed onto your elevator pushrod. Use the 4-40 hex nut to jam against the
link to prevent it from turning. If you have already been flying your Reaction for a while, the
double horn is easy to retrofit into existing ARFs.
|
Acknowledgements
Many thanks to Mr. Dave Rigotti of Ohio for the original implementation of this idea.
<Back to previous page
|


